With the release of V6.3 Reflex+ Software, boost control for a Supercharger or Turbocharger based off front wheel speed, gear position, and ethanol content is now available for your LTx vehicle equipped with the MOTIV Reflex+ port controller.
In this particular document we will cover the basics for boost control with a positive displacement supercharger utilizing a dual port vacuum bypass actuator with MAC valve or SmoothBoost.
BOOST CONTROL HARDWARE SETUP with Vacuum Bypass:
In simplest terms replace the GM bypass control valve with the MAC valve as shown above. While GM had already equipped the LT4 supercharger with an electronically controlled valve, it is too weak to control boost repeatably. The MAC valve provides repeatable boost control.
BOOST CONTROL HARDWARE SETUP with SmoothBoost:

If you have a SmoothBoost, you'll need their SB-DCA Signal Converter. Make all connections as specified by SmoothBoost and then connect the SmoothBoost WHITE wire (ECU PW NEG PULSE IN) to the ReFlex+ AUX1 output, also WHITE wire.
BOOST CONTROL SOFTWARE SETUP:
The ReFlex+ standalone boost controller should be assigned to AUX1 using the AUX mode selector.

In TunerPro start by setting the Parameter Tree to View by: Parameter Category
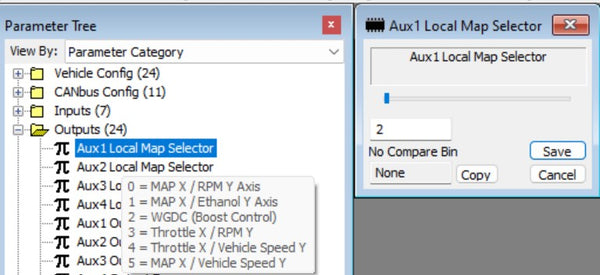
Open up the Outputs Folder and open AUX1 Local Map Selector and set to 2 for boost control at be active on that output.
Open the AUX1 Output frequency and set to:
0 - (20Hz) for a MAC valve on a vacuum operated bypass.
6 - (200Hz) for a SmoothBoost.
Next, we'll move to the Boost Setup folder.
Open the BoostPID - Config and set for your desired configuration, in this example we want to use Vehicle speed to control a vacuum bypass on a Positive Displacement (PD) Supercharger so we'll set to 22.
(NOTE: A turbo setup would use setting 1 or 2 based on control preference)
Next, we'll hop down to the BoostPID - Vehicle Speed X-Axis. Yes, we skipped over quite a few settings there, but they will have defaults in them that will be a good starting point as long as you started with the V6.3 BASE BIN.
Enter the Vehicle Speed range (MPH) in this table that you want to control boost across. In the case of the values shown in the table above, I'm looking to control the boost from 30 MPH to 100 MPH. Below 30 MPH we need to set boost at the lowest level possible, we want to modulate boost somewhere in the 30-100 mph range and above 100 MPH the tires on the car are capable of handling full boost, so no modulation required there. NOTE: this speed is based off front wheel speed so it won't go crazy if the rear wheels do start spinning, further stabilizing the boost control - it also means that boost will not increase in the dyno. You'll want to set the Boost Configuration bit to 0 (OFF - previous step) if you're performance testing on the dyno.

Now we'll touch on the Feed Forward (FF) tables, these tables are available in both kPa and PSIA, I prefer kPa for manifold pressure so that's the tables we'll stick with for this explanation. While the boost control will work without these tables, they provide a "base" table to characterize the boost control valve being used and allow the system to hit it's target boost as fast as possible under any condition. Shown above is the X-Axis table for FF table, this table should be set to range across the boost capability of the vehicle from low to high. So with a bypass valve there is always some minimum amount of boost that you will see, in the case of this vehicle the minimum is 115 kPa with the bypass full open and the maximum based off the pulley selection with the bypass closed is 210 kPa.

Once you have the FF boost operating levels defined, open the FF - Target kPa Duty Cycle (DC) and add the corresponding DC that drives that boost level. Now of course, you won't know what these values are so there are a few ways to determine these and we'll get to those later. For now, if you're using a Dual Port Vacuum Bypass or SmoothBoost I'd recommend leaving the default values shown above to start with.
Finally, it's time to get into setting our target boost levels! Let's open the boost Control category and select the "BoostPID - kPa Target - MPH vs Ethanol%" map.
This is the table you'll use to set your desired boost based off Vehicle Speed (MPH) and % Ethanol Content. Since we only run full Ethanol in this vehicle both rows are the same, but if I was to run pump gas and needed to lower boost with pump, we'd simply put the desired boost level for pump gas in the top row.
To set the boost level based off vehicle speed I'd use the highest gear that you have traction issues with. For the car shown here (7 speed manual) I used a 3rd gear with a pull from just off idle to max RPM and then lowered boost until it was at or below the traction limit across that gear. That will give you a good baseline for your MAX boost vs MPH.
Once we have that curve, save and close that map and open the "BoostPID - Target Gear Multiplier" to make changes additional boost target changes based off gear position.
Now with this Gear table we can modify the boost level in lower gears. As one might expect we can have higher boost in a higher gear at the same MPH as the final torque is reduced by the higher gear. For this vehicle setting the value to 90% for both first and second gears worked quite well, allowing full throttle accelerations in all gears with minimal traction issues.
While this a just a quick overview we'll dive deeper into setup and optimization with upcoming videos.
----------------------------------------
Below are brief explanations of the other Boost Setup settings if you find the need to adjust any of them - some are more turbo specific.
Overboost Time- This sets the amount of time in seconds an overboost is ignored before boost gets cut. Adjust to ignore small spikes caused by shifting.
Overboost reset time- This sets the amount of time boost is turned off due to an
overboost shut down before boost control is reactivated.
Boost Limit- This is the defined value that is considered an overboost. Set this 2-3psi higher than the boost target value.
Ethanol Limits- Sets the Min and Max ethanol % for Y axis. Set the Min value to the lowest ethanol that will be ran. Set the Max to the highest ethanol % to
run for boost. Most ethanol pumps don’t read exactly 85% so slightly
lower values may be used. Interpolation between Min and Max is linear.
This feature is set up so that standalone boost control can be used on
Flex Fuel tuned cars, or for switching between pump fuel and ethanol fuel
tunes.


